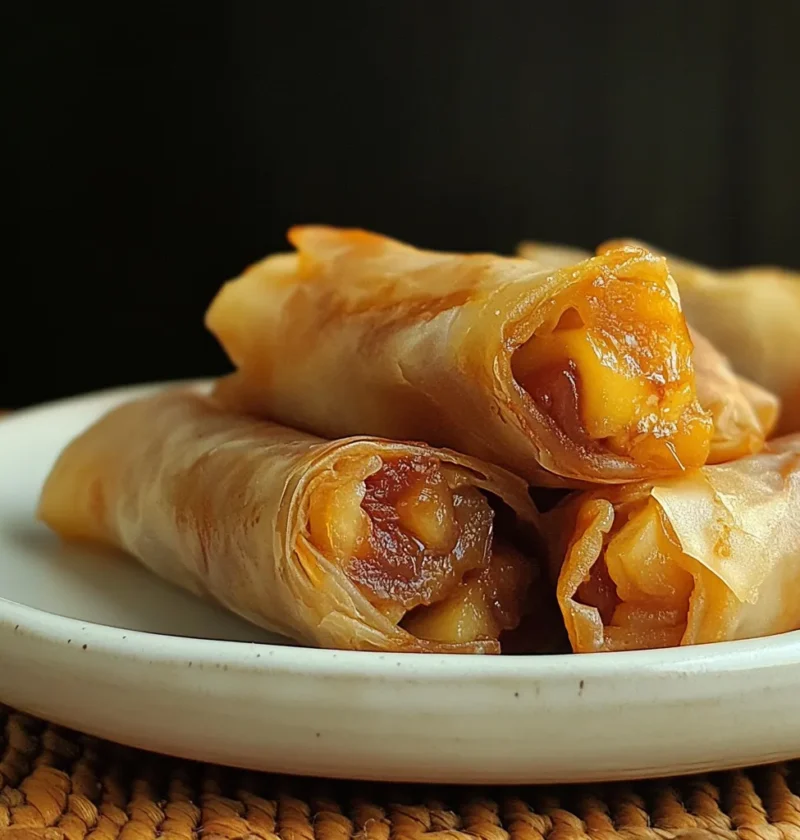
Few desserts capture the warmth and nostalgia of home quite like a classic apple pie—that cozy mix of sweet apples, brown sugar, and cinnamon wrapped in a golden, flaky crust. But what if you could enjoy all that goodness in a lighter, crispier, and easier-to-make form? Enter Baked Apple Pie Rice Paper Rolls—a delightful fusion of traditional apple pie and modern Asian-inspired technique that’s as fun to make as it is to eat.
These rolls are crispy on the outside, gooey on the inside, and naturally portioned for snacking or sharing. Using rice paper wrappers instead of pie crust makes them lighter, gluten-free, and easier to handle, while still capturing the essence of baked apple pie. Whether served warm with a scoop of vanilla ice cream or enjoyed on their own as a cozy afternoon treat, these rolls are the perfect blend of comfort and creativity.
Ready to transform your favorite fall dessert into something uniquely delicious? Let’s get rolling!
Recipe Overview
Baked Apple Pie Rice Paper Rolls take the comforting flavor of apple pie filling—cinnamon-spiced, caramelized apples—and wrap it in thin rice paper that crisps beautifully in the oven. The result is a satisfying, crunchy shell with a gooey, warm apple center. Best of all, they require minimal ingredients, no dough-rolling, and bake in under 30 minutes.
This dessert is perfect for anyone who loves apple pie but wants a lighter, faster, and gluten-free option.
Ingredients & Instructions
Ingredients
- 4–6 apples, peeled and sliced (choose Granny Smith or Honeycrisp for balance)
- 1/3 cup brown sugar (adjust to taste)
- 1 teaspoon cinnamon
- Part of a package of rice paper (round or square sheets work fine)
- 2 tablespoons cooking oil (neutral oil like canola, sunflower, or melted coconut oil)
Step-by-Step Instructions
1. Preheat the Oven
Set your oven to 450°F (230°C) so it’s ready for baking once your rolls are assembled. Line a baking sheet with parchment paper or lightly grease it with oil to prevent sticking.
2. Prepare the Apple Filling
Peel and thinly slice the apples into small wedges or thin strips—this ensures even cooking.
In a mixing bowl, combine the apples with brown sugar and cinnamon, stirring until the slices are evenly coated.
You can let the mixture sit for 5–10 minutes to draw out the apple juices and create a light syrupy coating—this will help the filling caramelize beautifully during baking.
Pro Tip: Add a pinch of nutmeg or a dash of vanilla extract for extra warmth and aroma.
3. Soften the Rice Paper
Fill a large mixing bowl with lukewarm water—about one-quarter full. Take one sheet of rice paper and dip it into the water for just a few seconds, until it softens and becomes pliable. Don’t let it soak too long, or it will tear easily.
Lay the softened sheet flat on a clean surface or damp towel to prevent sticking.
4. Fill and Fold the Rolls
Spoon 1–2 tablespoons of apple filling into the center of the rice paper sheet.
To fold:
- Fold the bottom of the rice paper up over the filling.
- Fold the sides in toward the center (like wrapping a burrito).
- Roll it up tightly toward the top, sealing the filling inside.
Repeat this process until all your apple filling is used.
Pro Tip: Work with one sheet at a time to prevent sticking or tearing.
5. Brush and Bake
Place the rolls seam-side down on your prepared baking sheet. Brush both sides with a little cooking oil—this helps the rice paper turn crisp and golden in the oven.
Bake for 25–30 minutes, turning them 2–3 times during baking to ensure even crispness on all sides. The rolls are done when they look golden-brown and slightly blistered.
6. Cool and Serve
Remove the rolls from the oven and let them cool slightly before serving. The filling will be hot and caramelized, so give it a few minutes to settle.
Serve warm on their own, dusted with a little extra cinnamon sugar, or pair them with a small bowl of vanilla ice cream, caramel sauce, or whipped cream for a cozy dessert treat.
Cooking Tips & Variations
1. Choose the Right Apples
For the perfect filling texture, use a mix of sweet and tart apples—like Granny Smith for tang and Honeycrisp or Fuji for sweetness. This balance prevents the filling from being overly sugary.
2. Add a Flavor Twist
- Caramel Lovers: Drizzle a little caramel sauce over the apples before rolling.
- Nutty Crunch: Add finely chopped pecans or walnuts to the filling for extra texture.
- Spiced Upgrade: Try a sprinkle of cardamom, clove, or pumpkin pie spice to give your rolls a deeper autumn flavor.
3. Fry for Extra Crispness
While baking keeps things light, you can also pan-fry the rolls in a little oil for a few minutes per side until crisp and golden for a more indulgent version.
4. Make It Vegan or Sugar-Free
This recipe is naturally vegan-friendly if you use plant-based oil and avoid dairy toppings. For a lower-sugar option, swap brown sugar for coconut sugar, monk fruit sweetener, or a drizzle of maple syrup.
5. Serving Ideas
- Serve with a dusting of powdered sugar and a scoop of vegan vanilla ice cream.
- Pair with warm caramel dip or honey yogurt for a lighter take.
- Enjoy cold the next day as a sweet breakfast or snack.
Storage & Serving Suggestions
Storage
- Room Temperature: Best eaten fresh, but can sit out for up to 4 hours.
- Refrigerator: Store leftovers in an airtight container for up to 2 days. Reheat in the oven at 375°F for 5–8 minutes to re-crisp.
- Freezer: Not recommended, as rice paper tends to lose its texture after thawing.
Serving
Serve these warm and golden rolls with a side of:
- Whipped cream or Greek yogurt for a creamy contrast.
- Hot tea, chai, or coffee for the perfect afternoon pairing.
- Vanilla custard or caramel drizzle for an indulgent dessert moment.
Whether you’re entertaining guests or enjoying a quiet night in, these rolls are a comforting way to enjoy the flavors of apple pie—without the fuss of making crust.
These Baked Apple Pie Rice Paper Rolls are proof that you can reinvent a classic dessert into something lighter, faster, and still utterly satisfying. The crispy rice paper adds a delicate crunch that pairs beautifully with the gooey, cinnamon-kissed apple filling inside.
Perfect for fall, holidays, or any time you crave something sweet yet simple, this recipe delivers the essence of apple pie in every bite—without the extra calories or effort. From the first crunch to the last warm bite, these rolls are a new kind of comfort that’s both fun to make and delightful to eat.
So next time you’re craving apple pie, grab some rice paper and apples—you might never go back to the traditional crust again!
FAQs
1. Can I use other fruits besides apples?
Yes! Pears, peaches, or even mixed berries work wonderfully. Just adjust the sugar to match the fruit’s sweetness.
2. Why did my rice paper tear?
It likely soaked too long in water. Dip it just until soft and pliable—about 5 seconds is enough.
3. Can I air fry these rolls instead of baking?
Absolutely! Brush with oil and air fry at 375°F for about 10–12 minutes, flipping halfway.
4. Can I make these ahead of time?
You can prepare the filling a day in advance, but assemble the rolls right before baking to keep the rice paper from sticking.
5. What type of oil works best?
Neutral oils like canola, sunflower, or coconut oil work great for crisping without overpowering the flavor.
Enjoy the cozy taste of apple pie in a light, crispy twist! These Baked Apple Pie Rice Paper Rolls are golden, gooey, and irresistibly easy to make—perfect for dessert or snacking.
